

Yosemite National Park is a very special place to visit in the winter. A blanket of snow at higher elevations, and even sometimes in the valley, helps make all the colors of the park more vibrant but keeps the crowds pretty low. We recently spent four days hiking and snowshoeing in Yosemite over the Martin Luther King, Jr. Day long weekend in January: we got accommodations with only a week’s notice and found solitude on trails that are normally mobbed in the summer. Check out the five trails we hiked over the course of four days below, listed from easiest to hardest. We list what we think would be the minimum required footwear to be sure-footed, but this depends a lot on the temperature in the park and how packed or icy the snow is on the trails. At the bottom of the post, we list some other viewpoints we checked out in the park and some quick logistical notes about where we stayed and driving in the park in winter.
Lower Yosemite Fall Trail, Yosemite Valley
- A well-traveled pathway to a gushing waterfall
- Trail Map (1.2 mile loop)
- Parking: Yosemite Falls or near Yosemite Lodge
- Footwear: Boots with good grip
- Time of day: morning to catch rainbows at the base of the falls
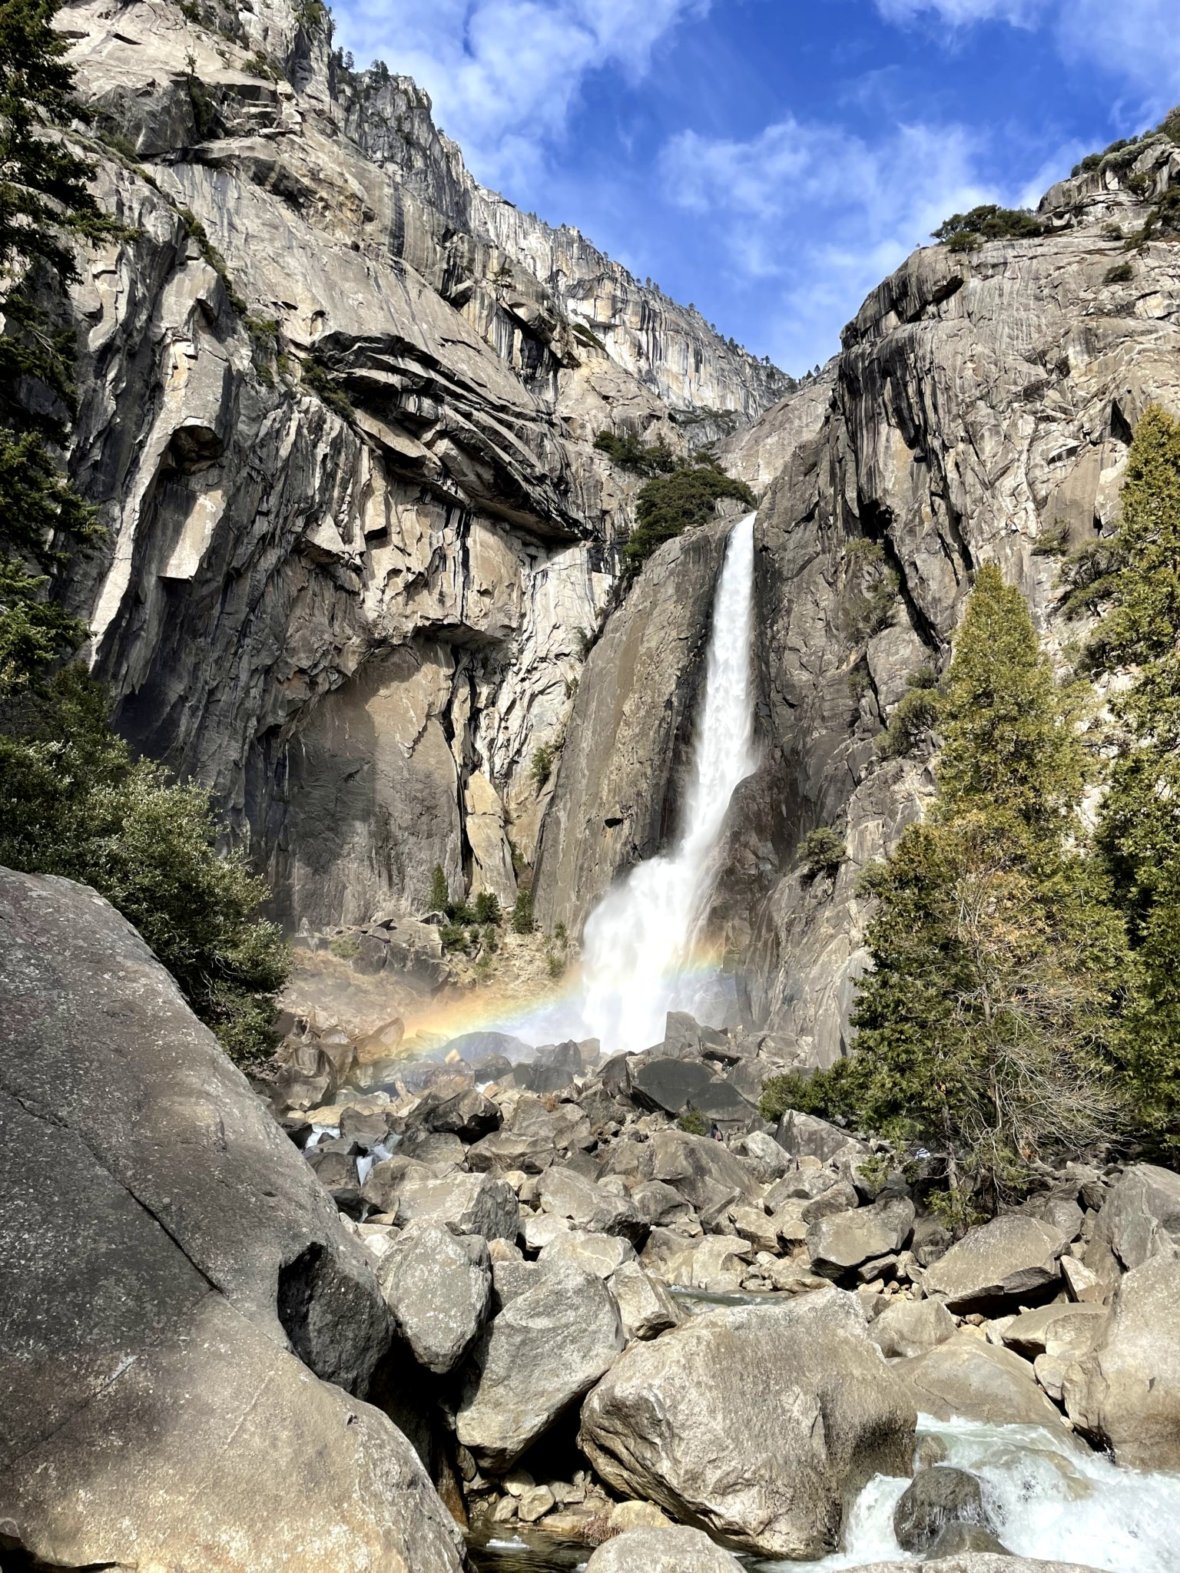
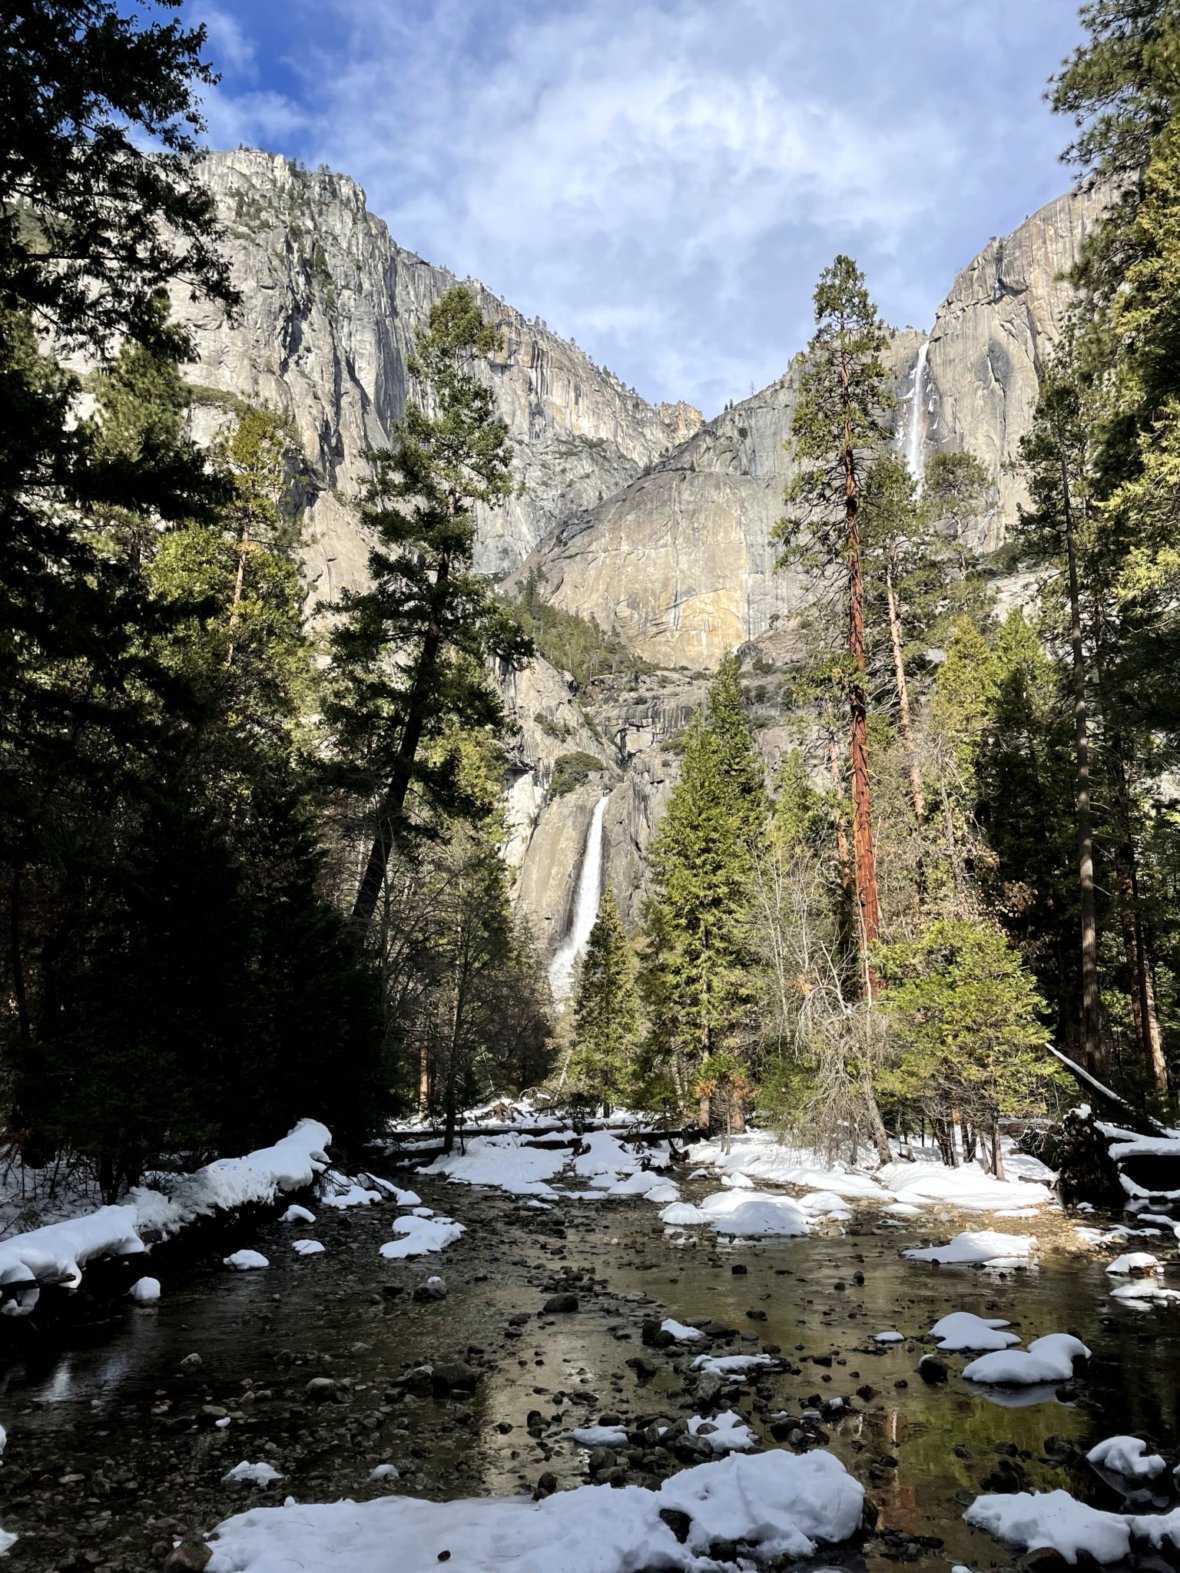
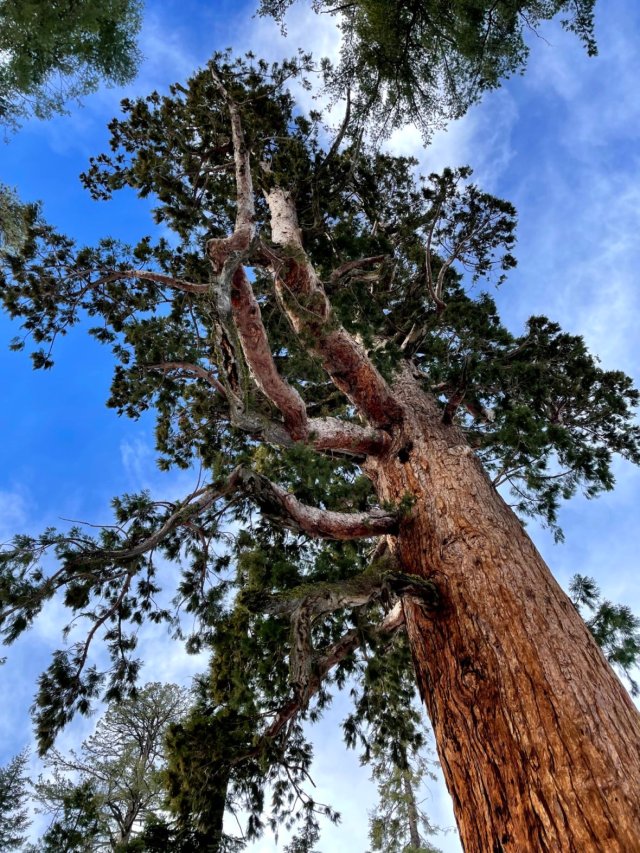
Lower Yosemite Fall is part of North America’s tallest waterfall. It dries up in the summer and fall, but in the winter and spring, it flows beautifully! We visited in the morning and saw rainbows forming as the water hit the rocks at the base of the falls. Most people take the loop clockwise. The path is a mix of pavement and wood planks. It can be a little slippery in places, but it is well-traveled and also sanded to make it less icy. This was the most crowded of the paths we took, but we found a little solitude by taking a detour off the main loop to “Falls View,” where we found John Muir’s historic home site and a lovely (albeit slightly obstructed) view of both falls and Yosemite Creek.
Mariposa Grove of the Giant Sequoias, Wawona
- Walk down a road or snow hike/show shoe through the woods to the most massive trees on Earth
- Trail Map (8.5 mile figure 8)
- Parking: Mariposa Grove Welcome Plaza
- Footwear: Traction cleats or snowshoes for the forest trail, or good boots if you stick to the main road
- Time of day: morning to noon to have enough time to hike
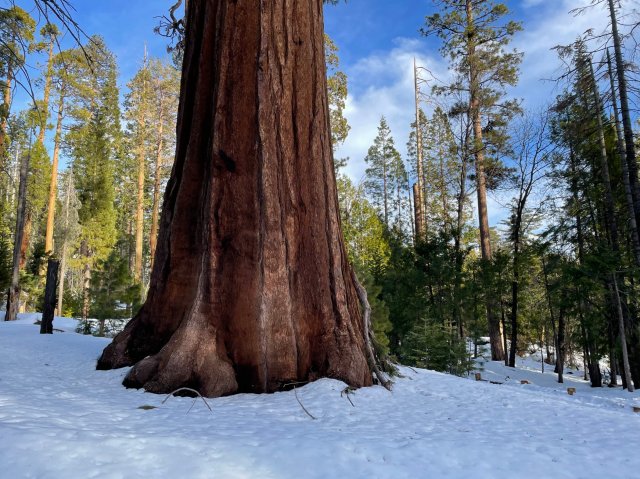
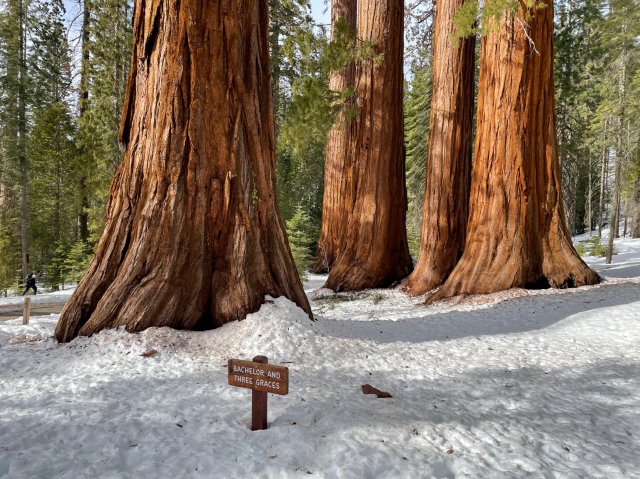
The Mariposa Grove of the Giant Sequoias is the largest grove of giant sequoias in Yosemite, and it is very conveniently located next to the southern entrance to the park. Because of its location and the length of hike needed to see some of the most iconic trees in the grove, we stopped here on our way into the park. It turns out that there are no bear lockers at the Welcome Plaza, so we decided to play it safe and store our food at the Wawona Campground a couple of miles further into the park. The road to the grove is closed to most vehicles, so we parked at the welcome plaza and hiked about two miles to get to the start of the grove. Lots of trees are visible right from the road, and some, like the Grizzly Giant and the Bachelor and Three Graces, are only a short detour away.
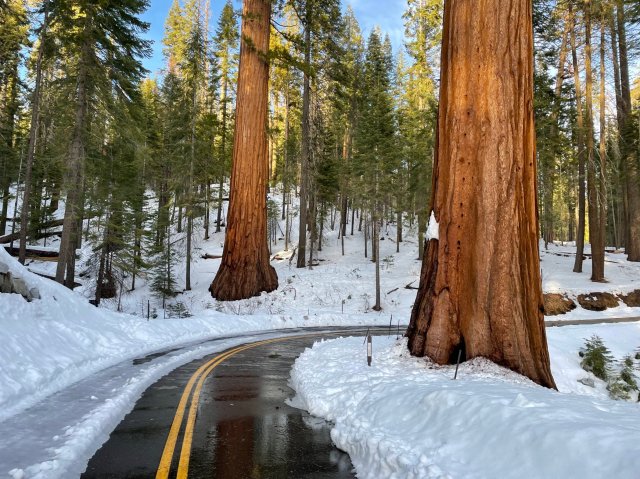
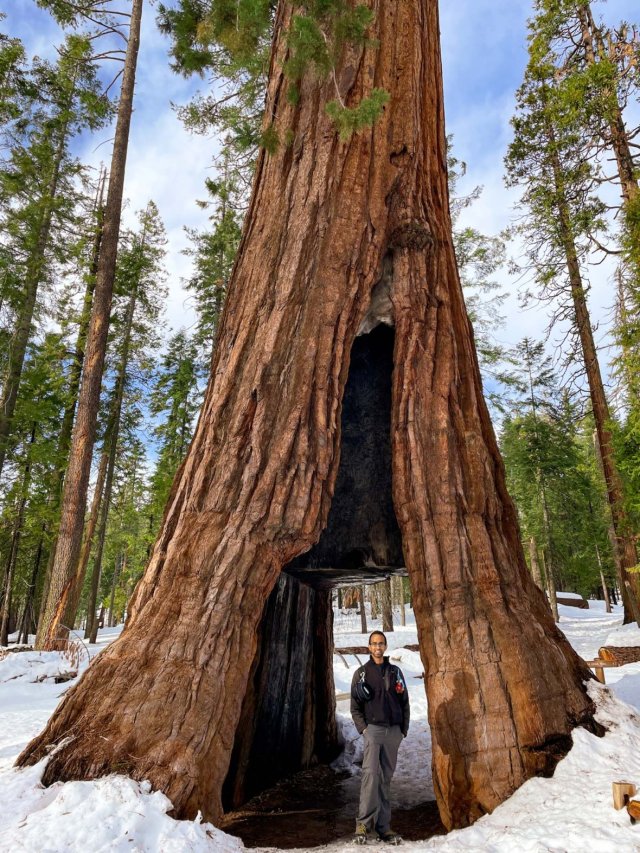
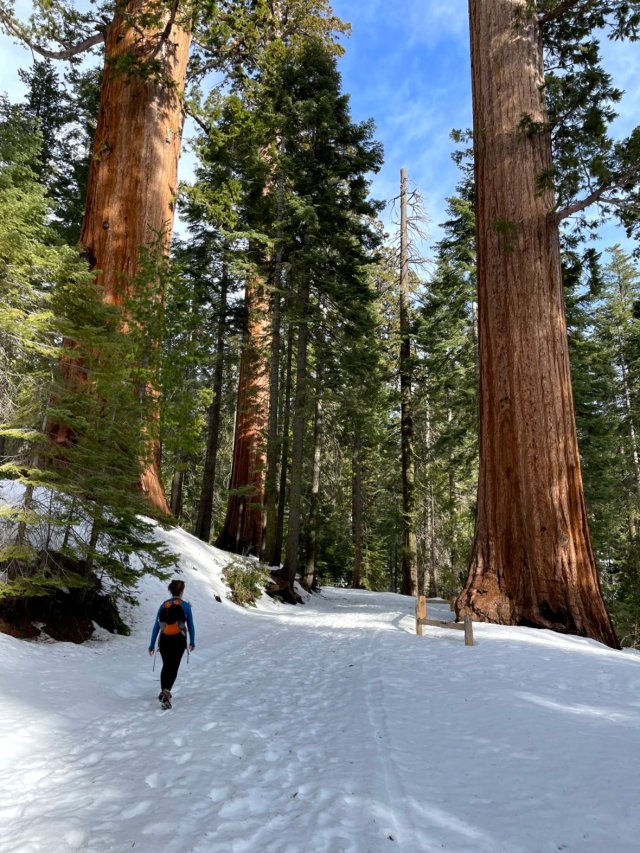
We had a bit more of an adventure by hiking up and into the grove; the wet and warm snow made hiking in traction devices quite hard (we were sinking in a lot), and so snow shoes may have been a wiser choice. In general, the main trails on the Mariposa Grove Winter Map were a bit easier to navigate than the shorter cut-offs, but getting up into the grove is absolutely worth it to appreciate the sheer scale and beauty of the trees. Seeing the red wood of the bark illuminated by the sun against the pure white snow and the blue sky was is of the highlights of being here in winter.
Dewey Point, Badger Pass
- A well-marked snowshoe route to a vertigo-inducing overlook of Yosemite Valley
- Trail Map (8 mile lollipop loop)
- Parking: Badger Pass Ski Area
- Footwear: Snowshoes (likely)
- Time of day: easier to get parking early, but good anytime
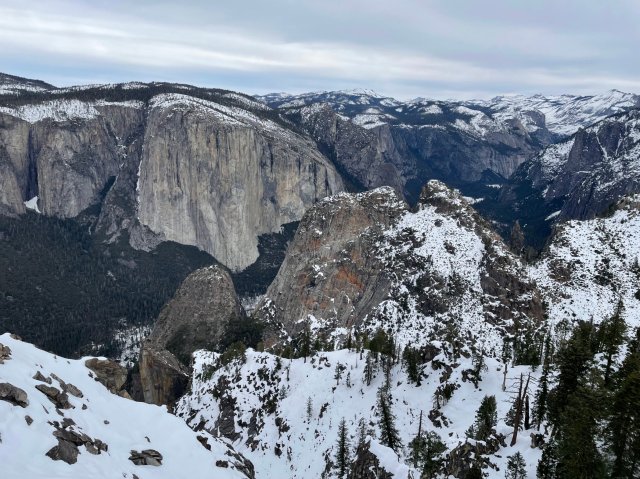
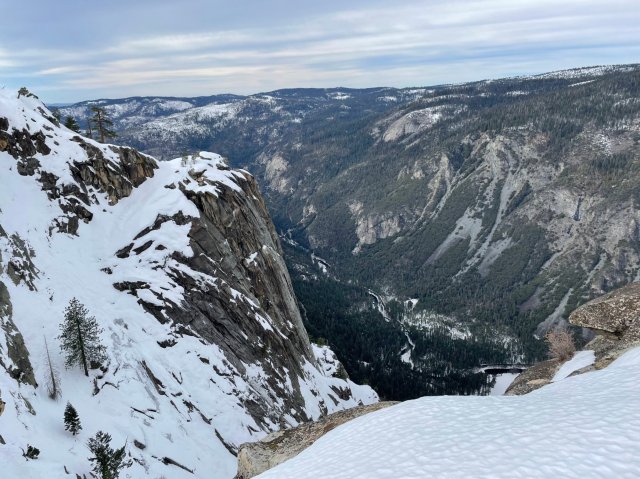
Badger Pass is the main hub for winter activity in Yosemite National Park. There’s a downhill ski hill, a snow tubing area, and also a large system of cross-country trails. We had a really nice half-day snowshoe excursion from Badger Pass to Dewey Point; we arrived a little after 10AM, and parking was tight but there were still spots to be had. The snowshoe route starts along Glacier Point Road (which is closed to traffic past Badger Pass in the Winter); it seemed super crowded at the start, but people spread out pretty quickly as we started heading uphill. There are groomed snow tracks for cross-country skiers on this part of the trail, so we made sure to stick to the edge of the trail away from the tracks. After about 0.7 miles, there are a couple of options to get to Dewey Point: the Meadow Trail (18) and the Ridge Trail (14). The difficulty ratings apply if you are cross-country skiing; in particular, the elevation changes in the last stretch on the Meadow Trail and all along the Ridge Trail were very challenging for many of the skiers we saw. In snowshoes, either route is nice and not more than moderate. The Meadow Trail goes through a forest with several clear areas, while the Ridge Trail is more open and provides glimpses of distant peaks along both sides of the trail. We opted to take the Meadow Trail to Dewey Point and the Ridge Trail back to make a lollipop loop. At Dewey Point itself, we had a head-on view of El Capitan from one side of a rock outcropping, and we could see all the way down to the Merced River on the other side.

Vernal and Nevada Falls, Yosemite Valley
- The winter version of the iconic hike to the top of two waterfalls
- Trail Map (10+ mile out and back)
- Parking: Trailhead parking near Happy Isles (or in Curry Village)
- Footwear: Traction cleats or snowshoes depending on trail conditions
- Time of day: morning so you have enough time to complete the hike in the daylight
On many of our trips to Yosemite in the summer, we’ve climbed up the steps of the famous Mist Trail en route to the top of Vernal and Nevada Falls. In winter, sections of the Mist Trail are closed owing to dangerous ice conditions. However, the tops of both falls are still accessible by switching back and forth between the Mist Trail and the John Muir Trail.
The closest parking is available at the Trailhead Parking near Happy Isles (there are also bear lockers here for storing food). If you can’t find a spot here, you can park back at Curry Village, like we did, which adds a few tenths of a mile. Another nice thing about this trail is the availability of several bathrooms along it: Happy Isles, near Vernal Fall, and near Nevada Fall. When we arrived, there were large sections of the trail that seemed passable without cleats, but we decided to keep them on to avoid any slips on the icy sections.
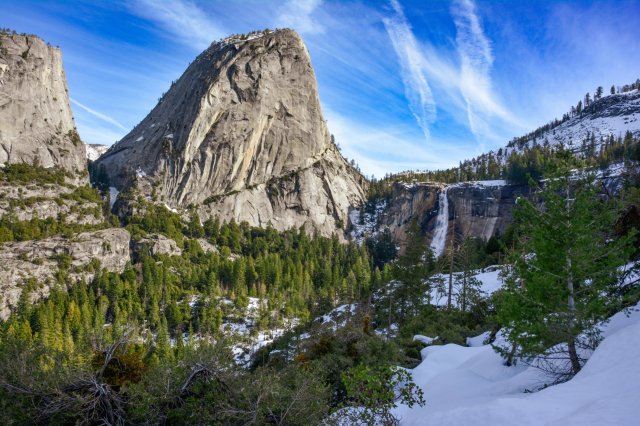
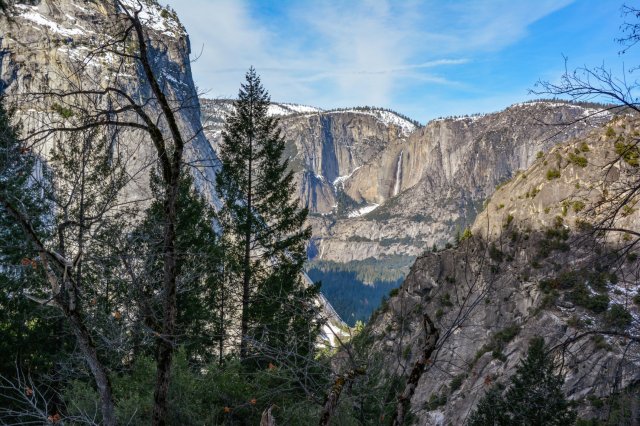
The first awesome views were over our shoulder on the mist trail, with Yosemite Falls framed by trees and granite cliffs. The most challenging sections of the trail started after the Vernal Falls Footbridge, where the trail was mostly covered with icy snow and the ascent became much steeper. This climb’s major reward is at Clark Point, where you have an amazing view of Nevada Fall and Liberty Cap for several minutes as you descend.
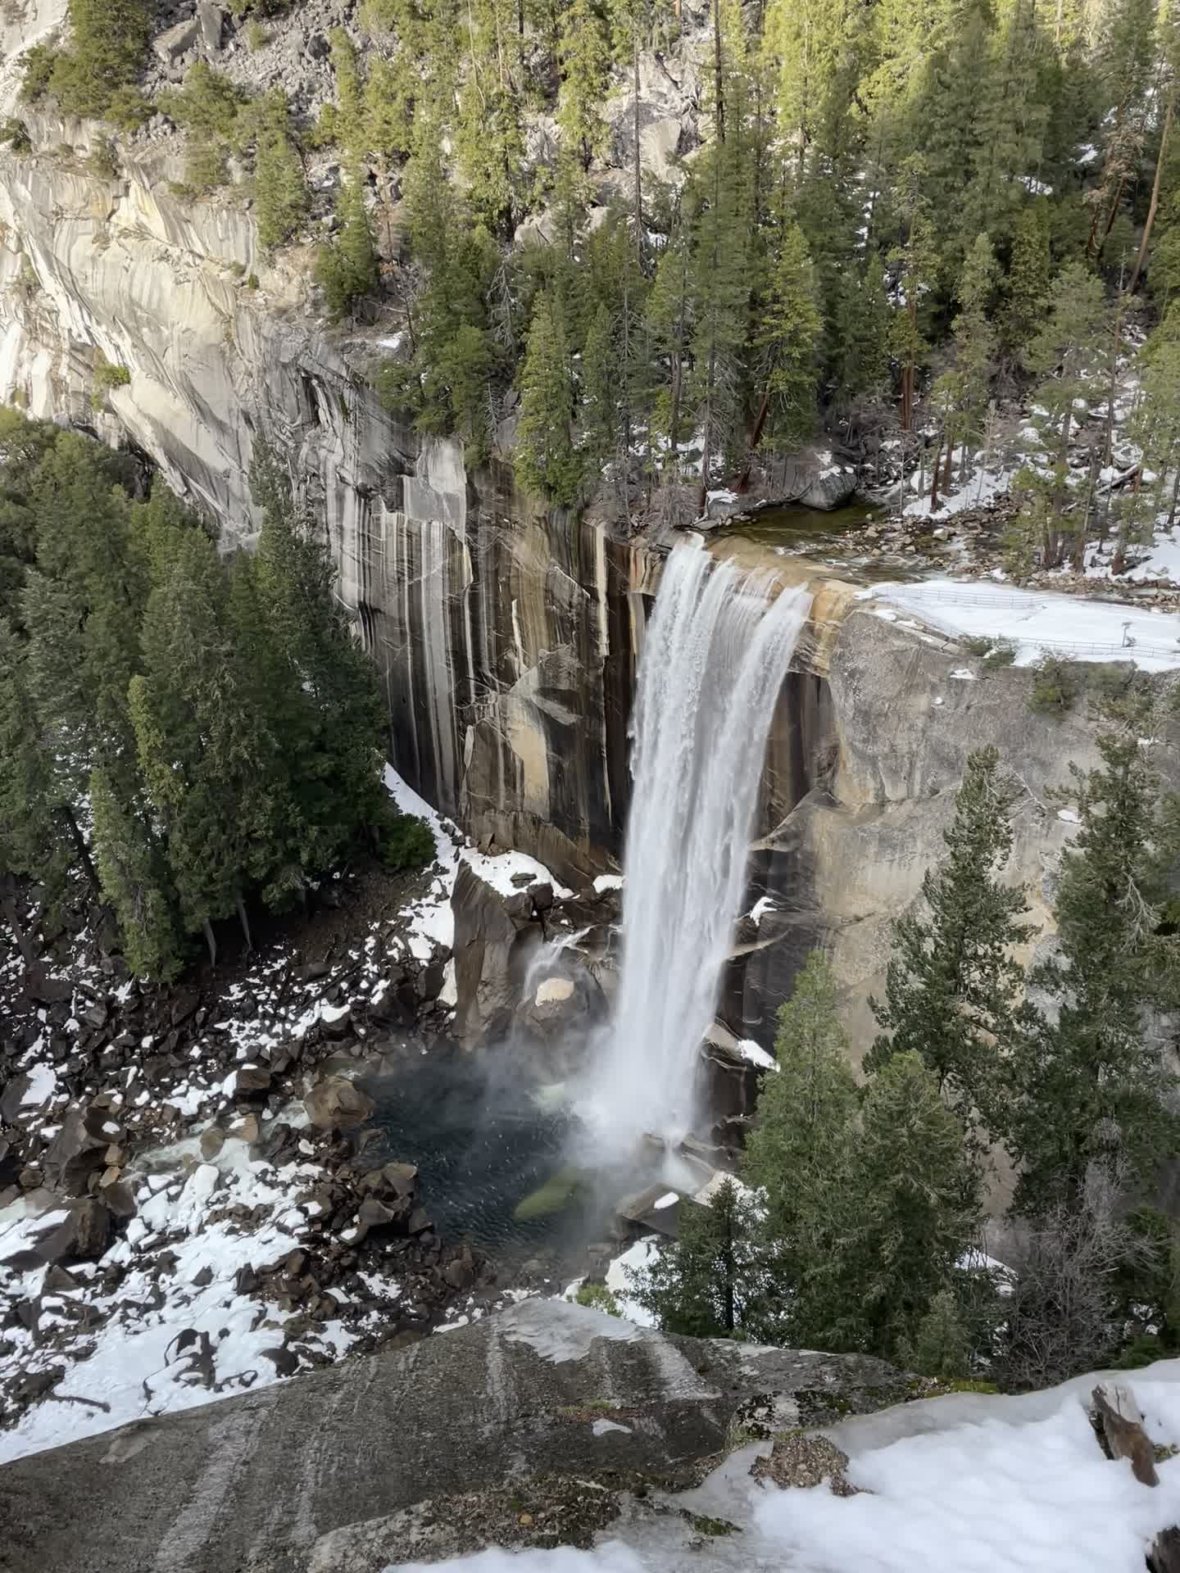
Vernal Fall is the first waterfall stop after Clark Point. We almost missed an amazing view of the falls along our descent; there is a photo spot on the AllTrails map, but to get to it, you need to descend a little from the mail trail to the fence line. From here, we could see the full height of Vernal Falls pouring into the valley below. We also continued along the trail and took the left fork to get to the top of the falls.
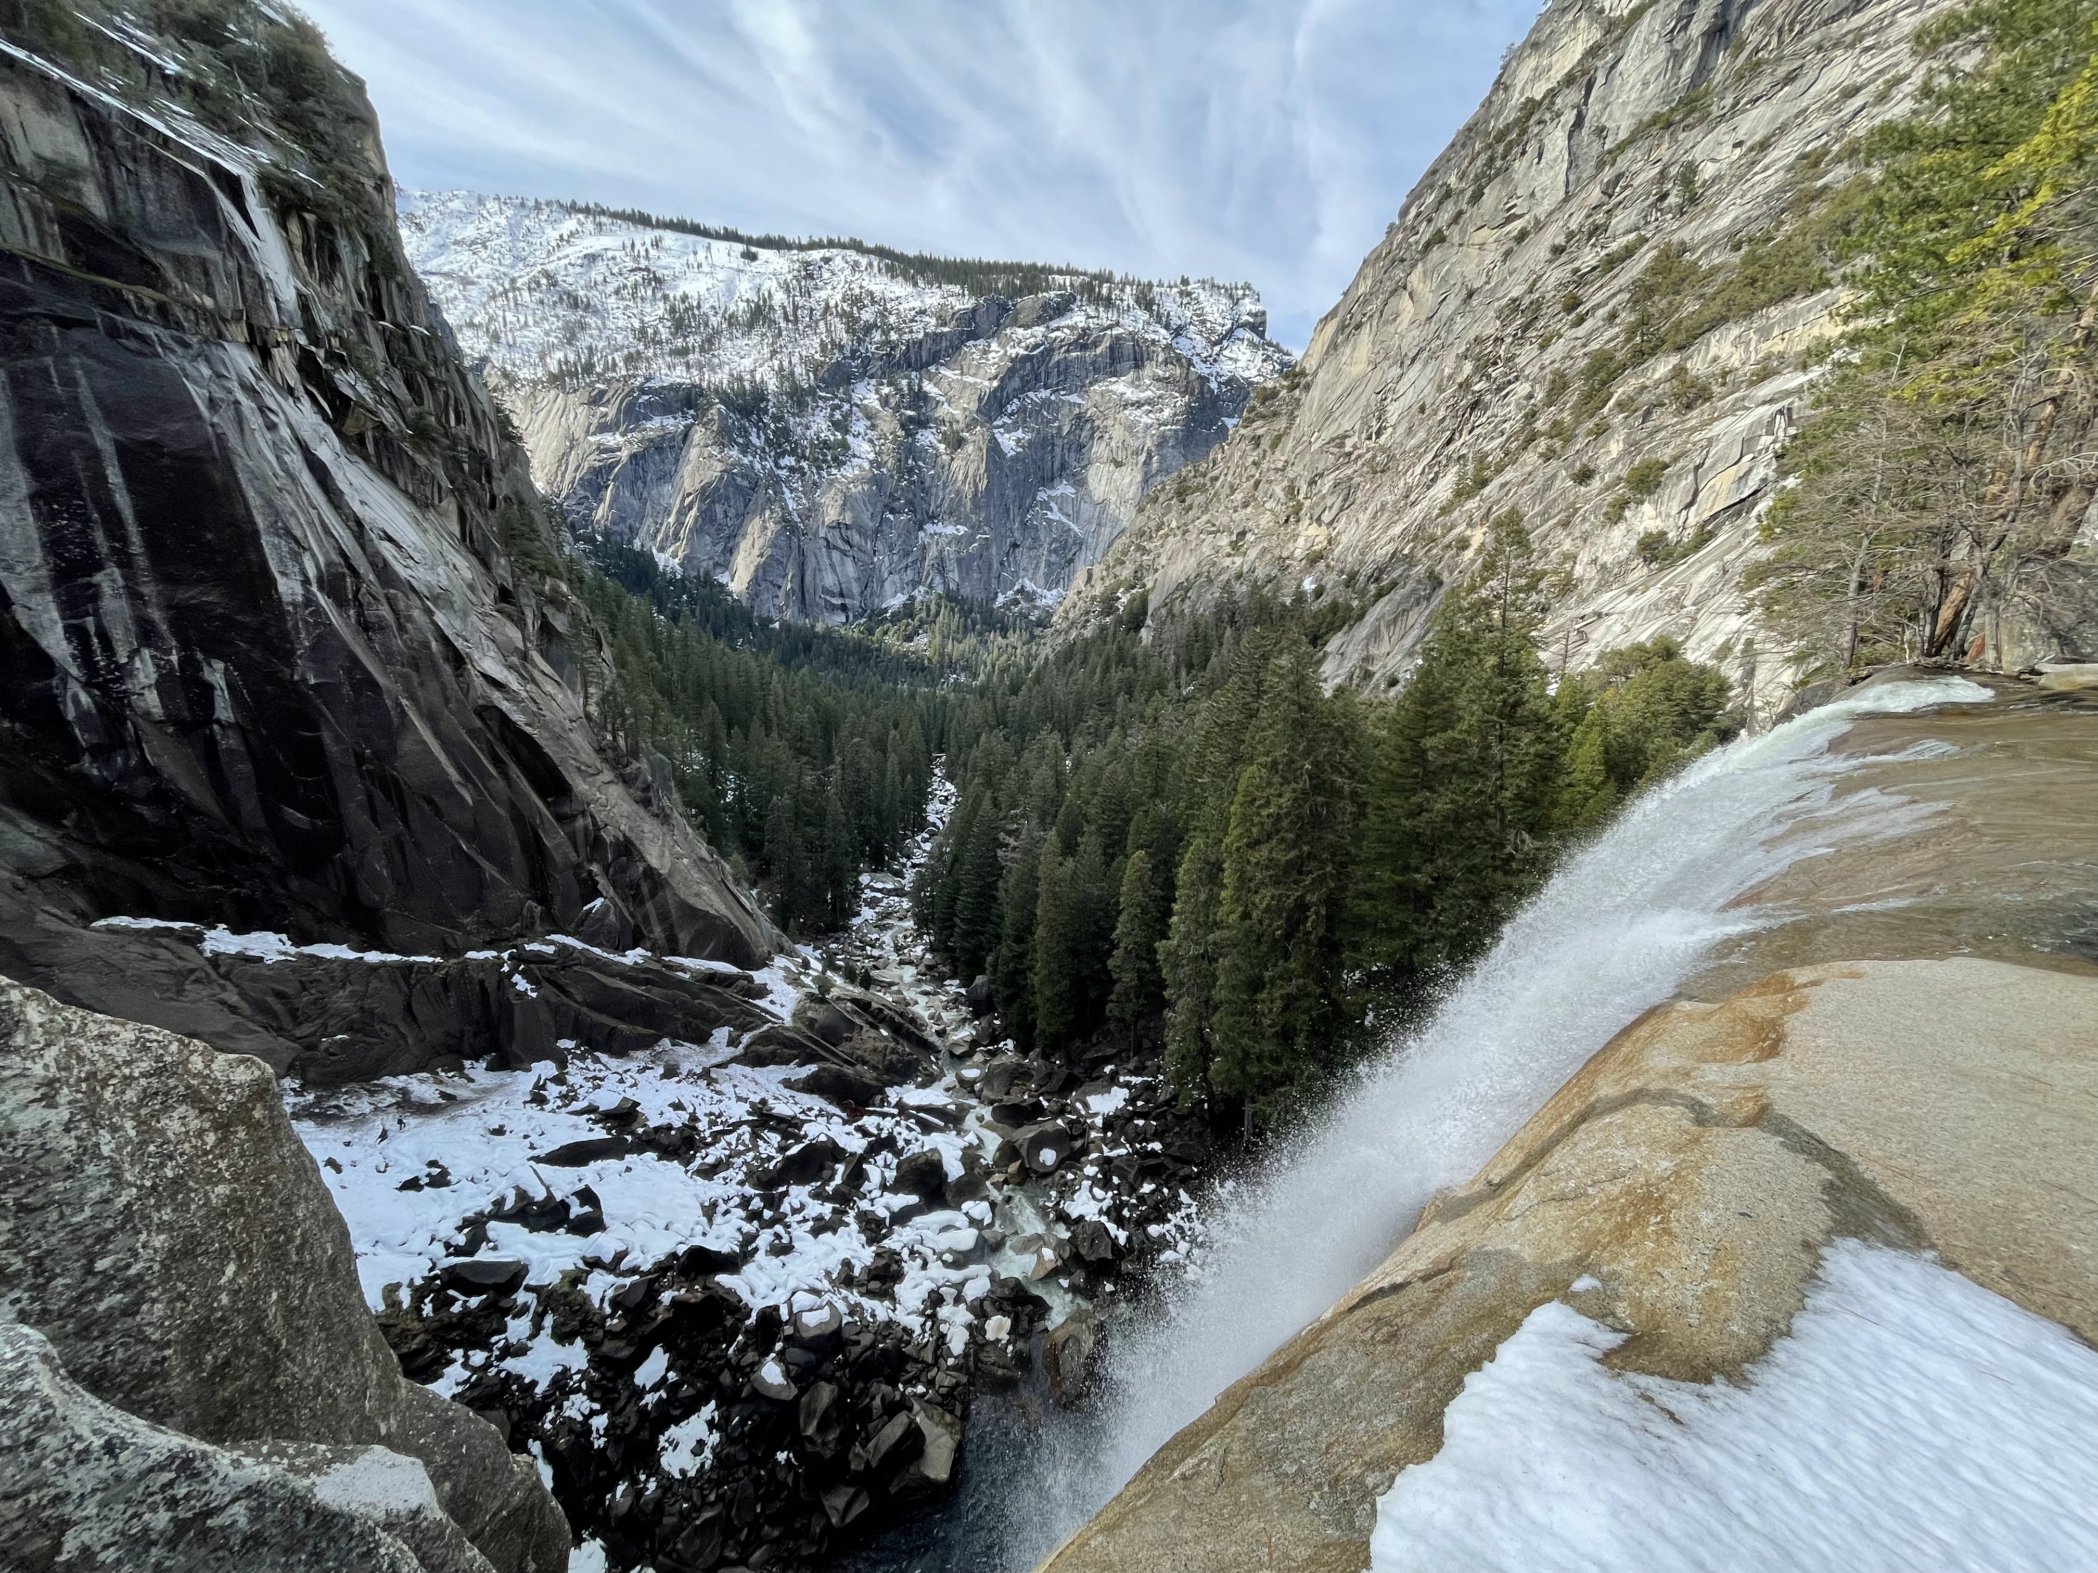
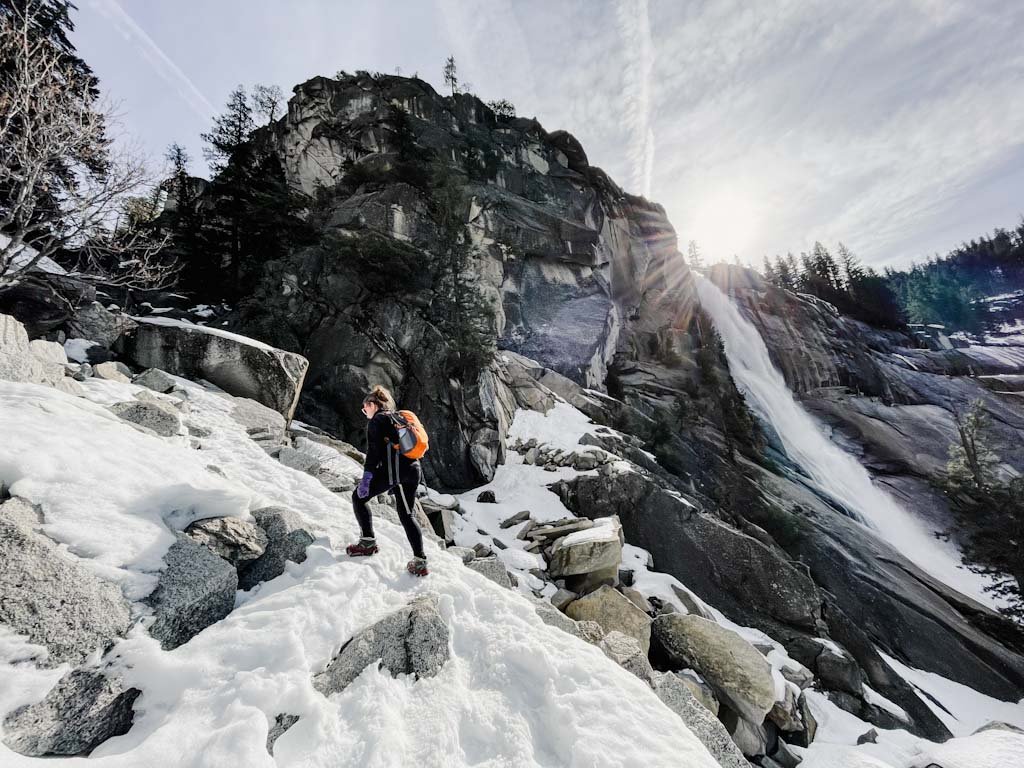
If you choose to turn around at Vernal Fall, the hike’s total length drops to around 8 miles. We decided to extend the hike further and continue on to the top of Nevada Fall. The footing along this section was the trickiest of all. On the day we visited, temperatures in the valley were quite warm, but it had snowed a lot just the week before, creating perfect conditions for slippery, icy snow, deep post-holes, and even flowing water near the high point of the trail! If you do decide to continue to the very top of the Nevada Fall, you’ll find awesome views of the Merced River and the cascade into the valley below (make sure to explore the area around the fence line to get this view), but stopping when you’re parallel to the waterfall (about 0.6 miles from the end of the trail) still provides some epic views without having to deal with as much of the sketchy walking surfaces.

Other Viewpoints in Yosemite Valley
Besides the hikes we mentioned, there are lots of other places to stop as you are driving in and out of Yosemite Valley. The span of time from one hour before sunset to one hour after tends to light up the sky and the rocks with an amazing palate of colors.
Sentinel Bridge, Cook’s Meadow, and Northside Drive
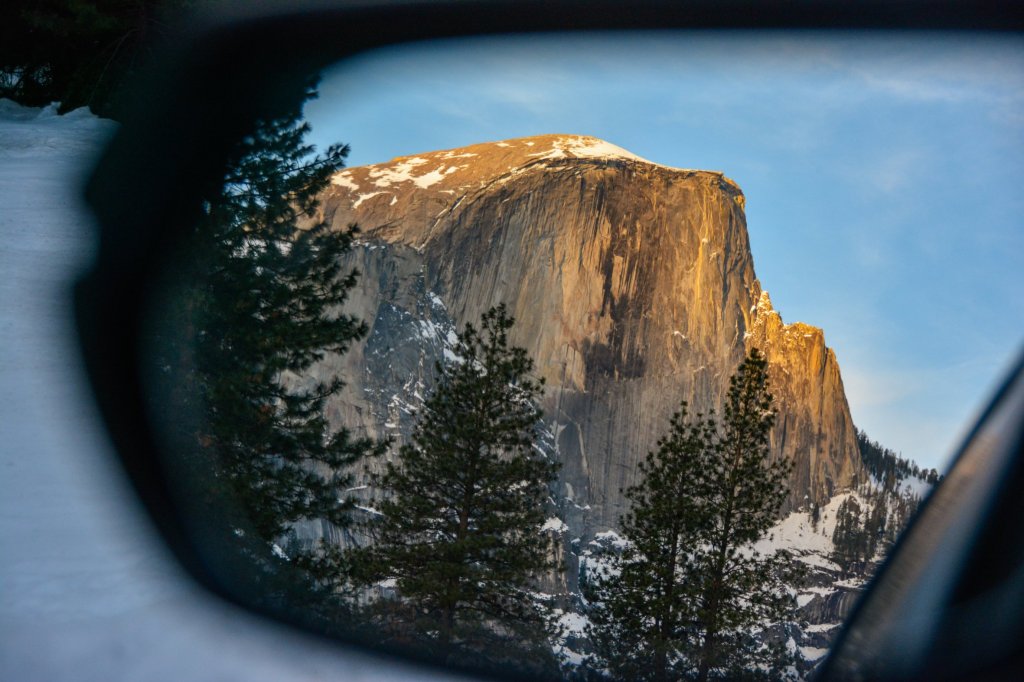
One of the most beautiful sites in Yosemite Valley is to watch the sun set onto the face of Half Dome, which glows a beautiful orange color starting about a half hour before the listed sunset time. We tried to catch this sight from Cook’s Meadow, but we got snarled in a 45-minute traffic jam and had to catch the sunset in the rear view mirror! If you do want to catch a Half Dome sunset from the valley, our recommendation is to get to a viewpoint like Sentinel Bridge or Cook’s Meadow (closer to Northside Drive) about an hour before sunset to avoid getting stuck without a view.
Valley View
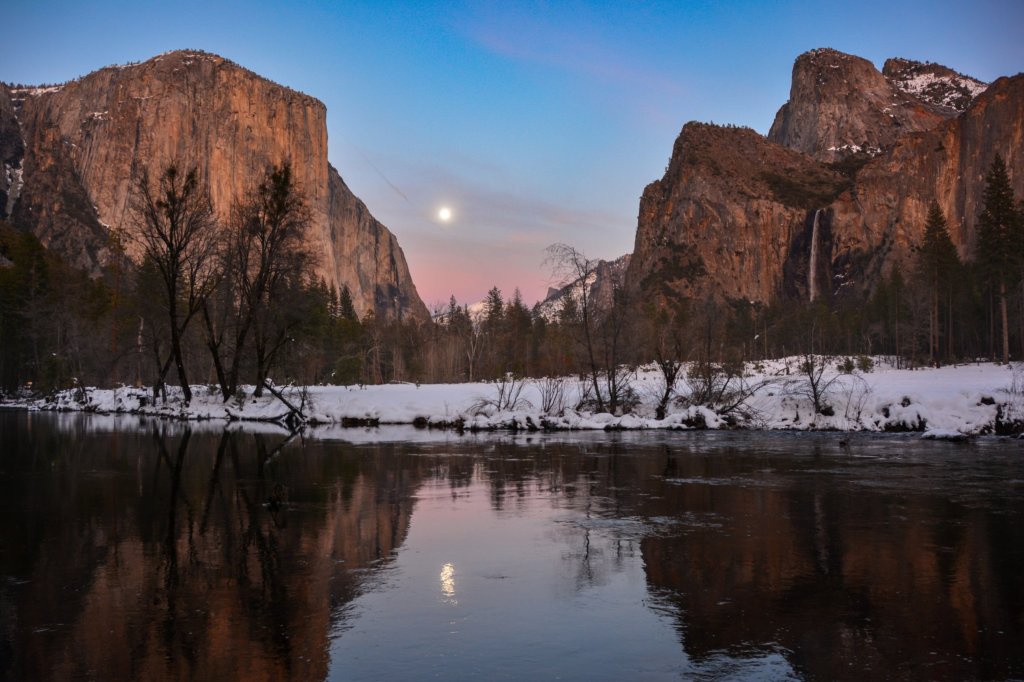
A happy consequence of our traffic jam is that we drove out of the valley later than expected and caught an amazing moon rise at Valley View, right off of Northside drive near where it intersects with Southside Drive at the western end of the valley. This viewpoint isn’t quite as famous as other points in the valley, and so it’s been easy for us to park here on a couple of visits. From here, you get a fabulous view of Bridalveil Fall and other granite peaks reflected in the Merced River.
Tunnel View and “Almost Tunnel View”

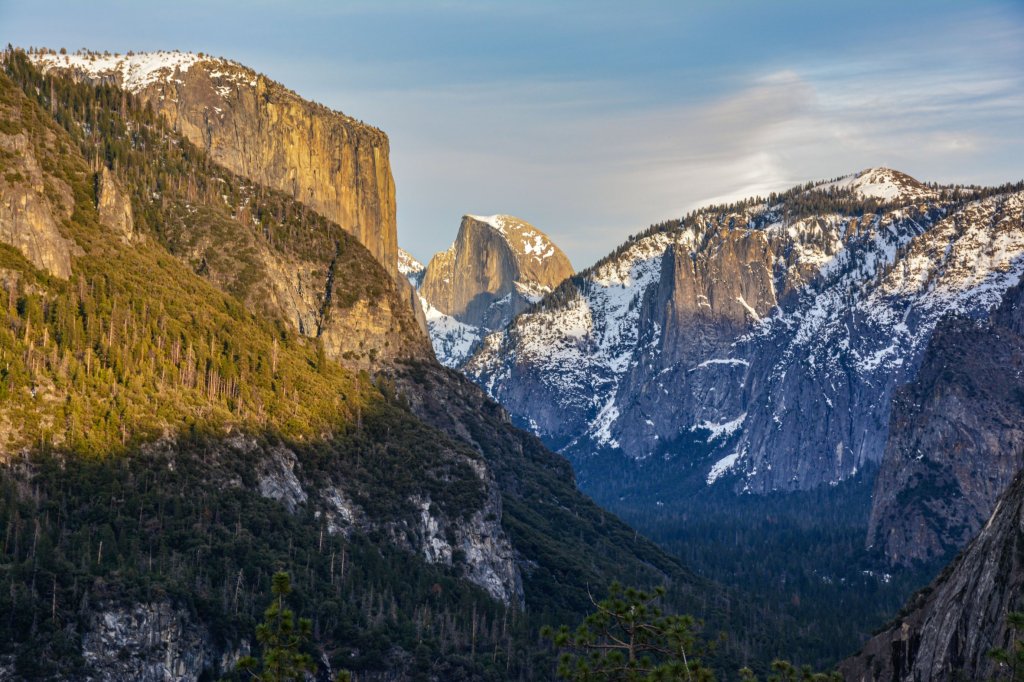
Tunnel View is one of the most iconic viewpoints as you drive into Yosemite Valley from the southern part of the park; the parking lots are just east of the Wawona Tunnel. At sunset, the area can be packed with very little parking. If you don’t manage to find a spot right away, try coming a little later (we had a nice moonlit view of the park from here later in the day). We also found a spot that provides a very similar vantage point to tunnel view, although without a view of Bridalveil Falls. If you can’t find a spot at Tunnel View, you can do what we did and drive back through the tunnel and park in the large roadside pullout on Wawona Road. From here, especially with a nice zoom lens, you can get a great picture of Half Dome and the surrounding granite peaks, all lit up in orange at sunset.
Driving in Yosemite Park in Winter

When you visit Yosemite National Park in winter, it is very possible that chain controls can be in effect both inside and outside the park. Getting chains on and off your car is a time consuming process, but it’s one that is necessary in some cases and gives you much better traction if you’re driving on slippery or snowy road surfaces. Regardless of whether chain controls are needed, there are always sections of road that could be snowy or have patchy ice, so be sure to watch your speed and take curves gently.
There are three levels of chain controls, and in the lower levels, snow tires can exempt you from needing chains:
- R-1: Chains required unless you have a car, SUV, or light truck with snow tires or M+S (all season) tires on the drive wheels.
- R-2: Chains required unless you have a car, SUV, or light truck with snow tires or M+S (all season) tires and 4-Wheel Drive or All-Wheel Drive.
- R-3: Chains required, no exceptions.
However, when the chain signs go up, you always have to have chains with you. A hitch with this requirement is that if you are renting a car, many rental car agencies don’t provide chains or even allow you to put chains onto their car! We found that Lyft, the rideshare service, offers car rentals in some cities that allows you to reserve a specific car with AWD and add tire chains onto your rental for free! In particular, there are pick up locations in San Francisco and San Jose in the Bay Area. The car we got, a Honda CR-V Hybrid, was very comfortable, and pickup was quick and easy. To make sure that you have access to chains, make sure you book from a Lyft location, not a Sixt partner location.
Where to stay in the park in winter
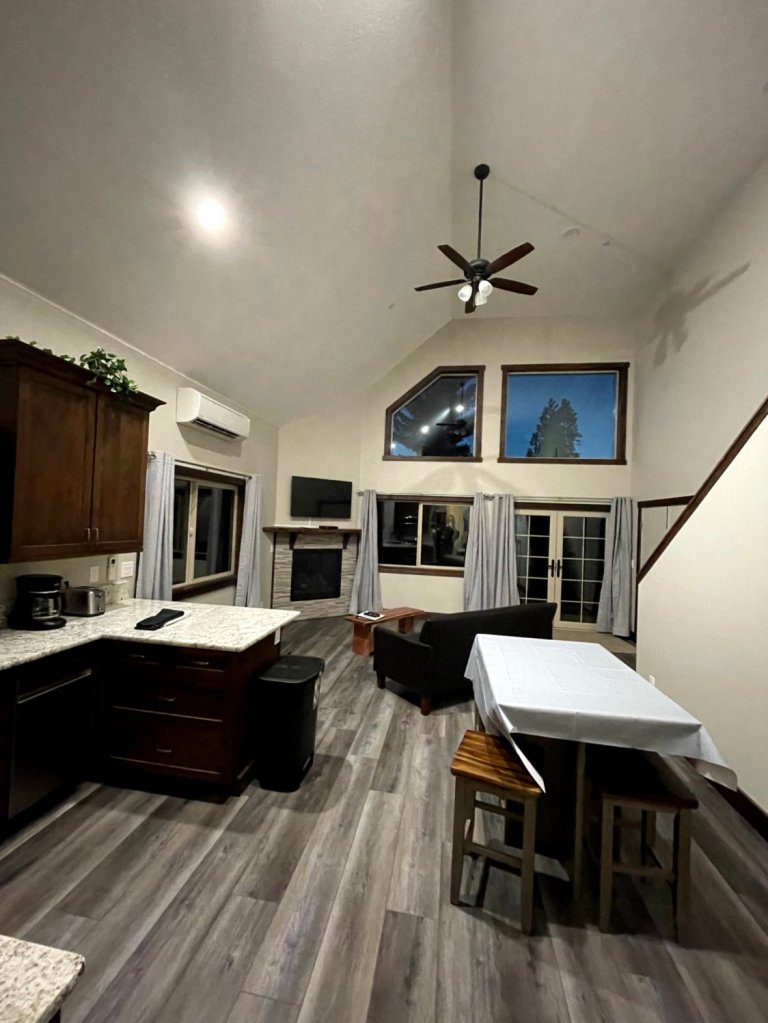
On this trip, which was during a COVID-19 surge, we wanted to stay in an area where we could keep mostly to ourselves indoors, including having access to our own kitchen and laundry. This is why we decided to stay in Yosemite West, a small private community that is only accessible from the Wawona Road inside Yosemite National Park. In addition to having many types of vacation rentals through Scenic Wonders, AirBnB, and VRBO, Yosemite West has a perfect central location for winter recreation; it is less than 25 minutes to all three of the areas of the park we visited (Mariposa Grove, Badger Pass, and Yosemite Valley). For the long weekend in January, we were able to secure a rental with only a week’s notice. We would strongly recommend staying here, although you should check the reviews and ratings of the various properties to make sure they are suitable for you.
An exception: if you are planning to visit Yosemite during Firefall season (late February), we would strongly recommend staying in Yosemite Valley. The traffic and restrictions in effect could make getting around very difficult otherwise. Accommodations can look like they are sold out months in advance, but check back daily as new availability pops up often. The official portal for lodging in the valley is https://www.travelyosemite.com/, which is often not the first link that pops up in a Google search.
That’s a wrap on our winter hiking trip to Yosemite! What other winter activities do you enjoy in the park? Do you have any tips for pairing some of these activities with viewing the Firefall in February? We’d love to hear from you!

Wow! Stunning photos! Winter seems like a great time of year to visit Yosemite. Thanks for the tips. I’m curious about the use of the bear lockers… given that it’s winter, are bears still a concern?
LikeLiked by 1 person
Hi Diana! Thank you for reading and for the compliment! It is indeed a great time to visit. You have a great question, actually one we were wondering about, ourselves. According to this Yosemite website (https://www.nps.gov/yose/blogs/where-do-bears-go-in-winter.htm), bear activity is dependent on food availability. So if the winter has been mild or the bears can find a food source, they may shift or skip their hibernation schedule. This is why it’s a good idea to practice safe food storage in the park year-round. You are not required to store food in bear lockers in day use areas, but it is a good idea. You are required to get food out of your car if you are leaving it overnight.
LikeLiked by 1 person
Interesting, I didn’t know bears could skip hibernation. Thank you for the information. I hope to visit Yosemite someday soon!
LikeLike
Wow, this is such a beautiful post with so many amazing photos. I’ve never been to Yosemite, but – much to my heat-loving husband’s horror – always wanted to visit during the winter because winter is a magical season that transforms our world into a magical winter wonderland. Yes, it comes with freezing temperatures and storms, but the beauty and adventures it brings are incredible. Thanks for sharing, and have a good day 🙂 Aiva xx
LikeLike